J.Gong
2026-11-07
7.51min
AI generated 3D scenes
This is the post continue AI generated GLBs.
Blender generate one scene
Last post, I mentioned ZZ是画渣-不用GPT-6!本地模型操作Blender建模教程,0元复刻GPT-6的相同效果?
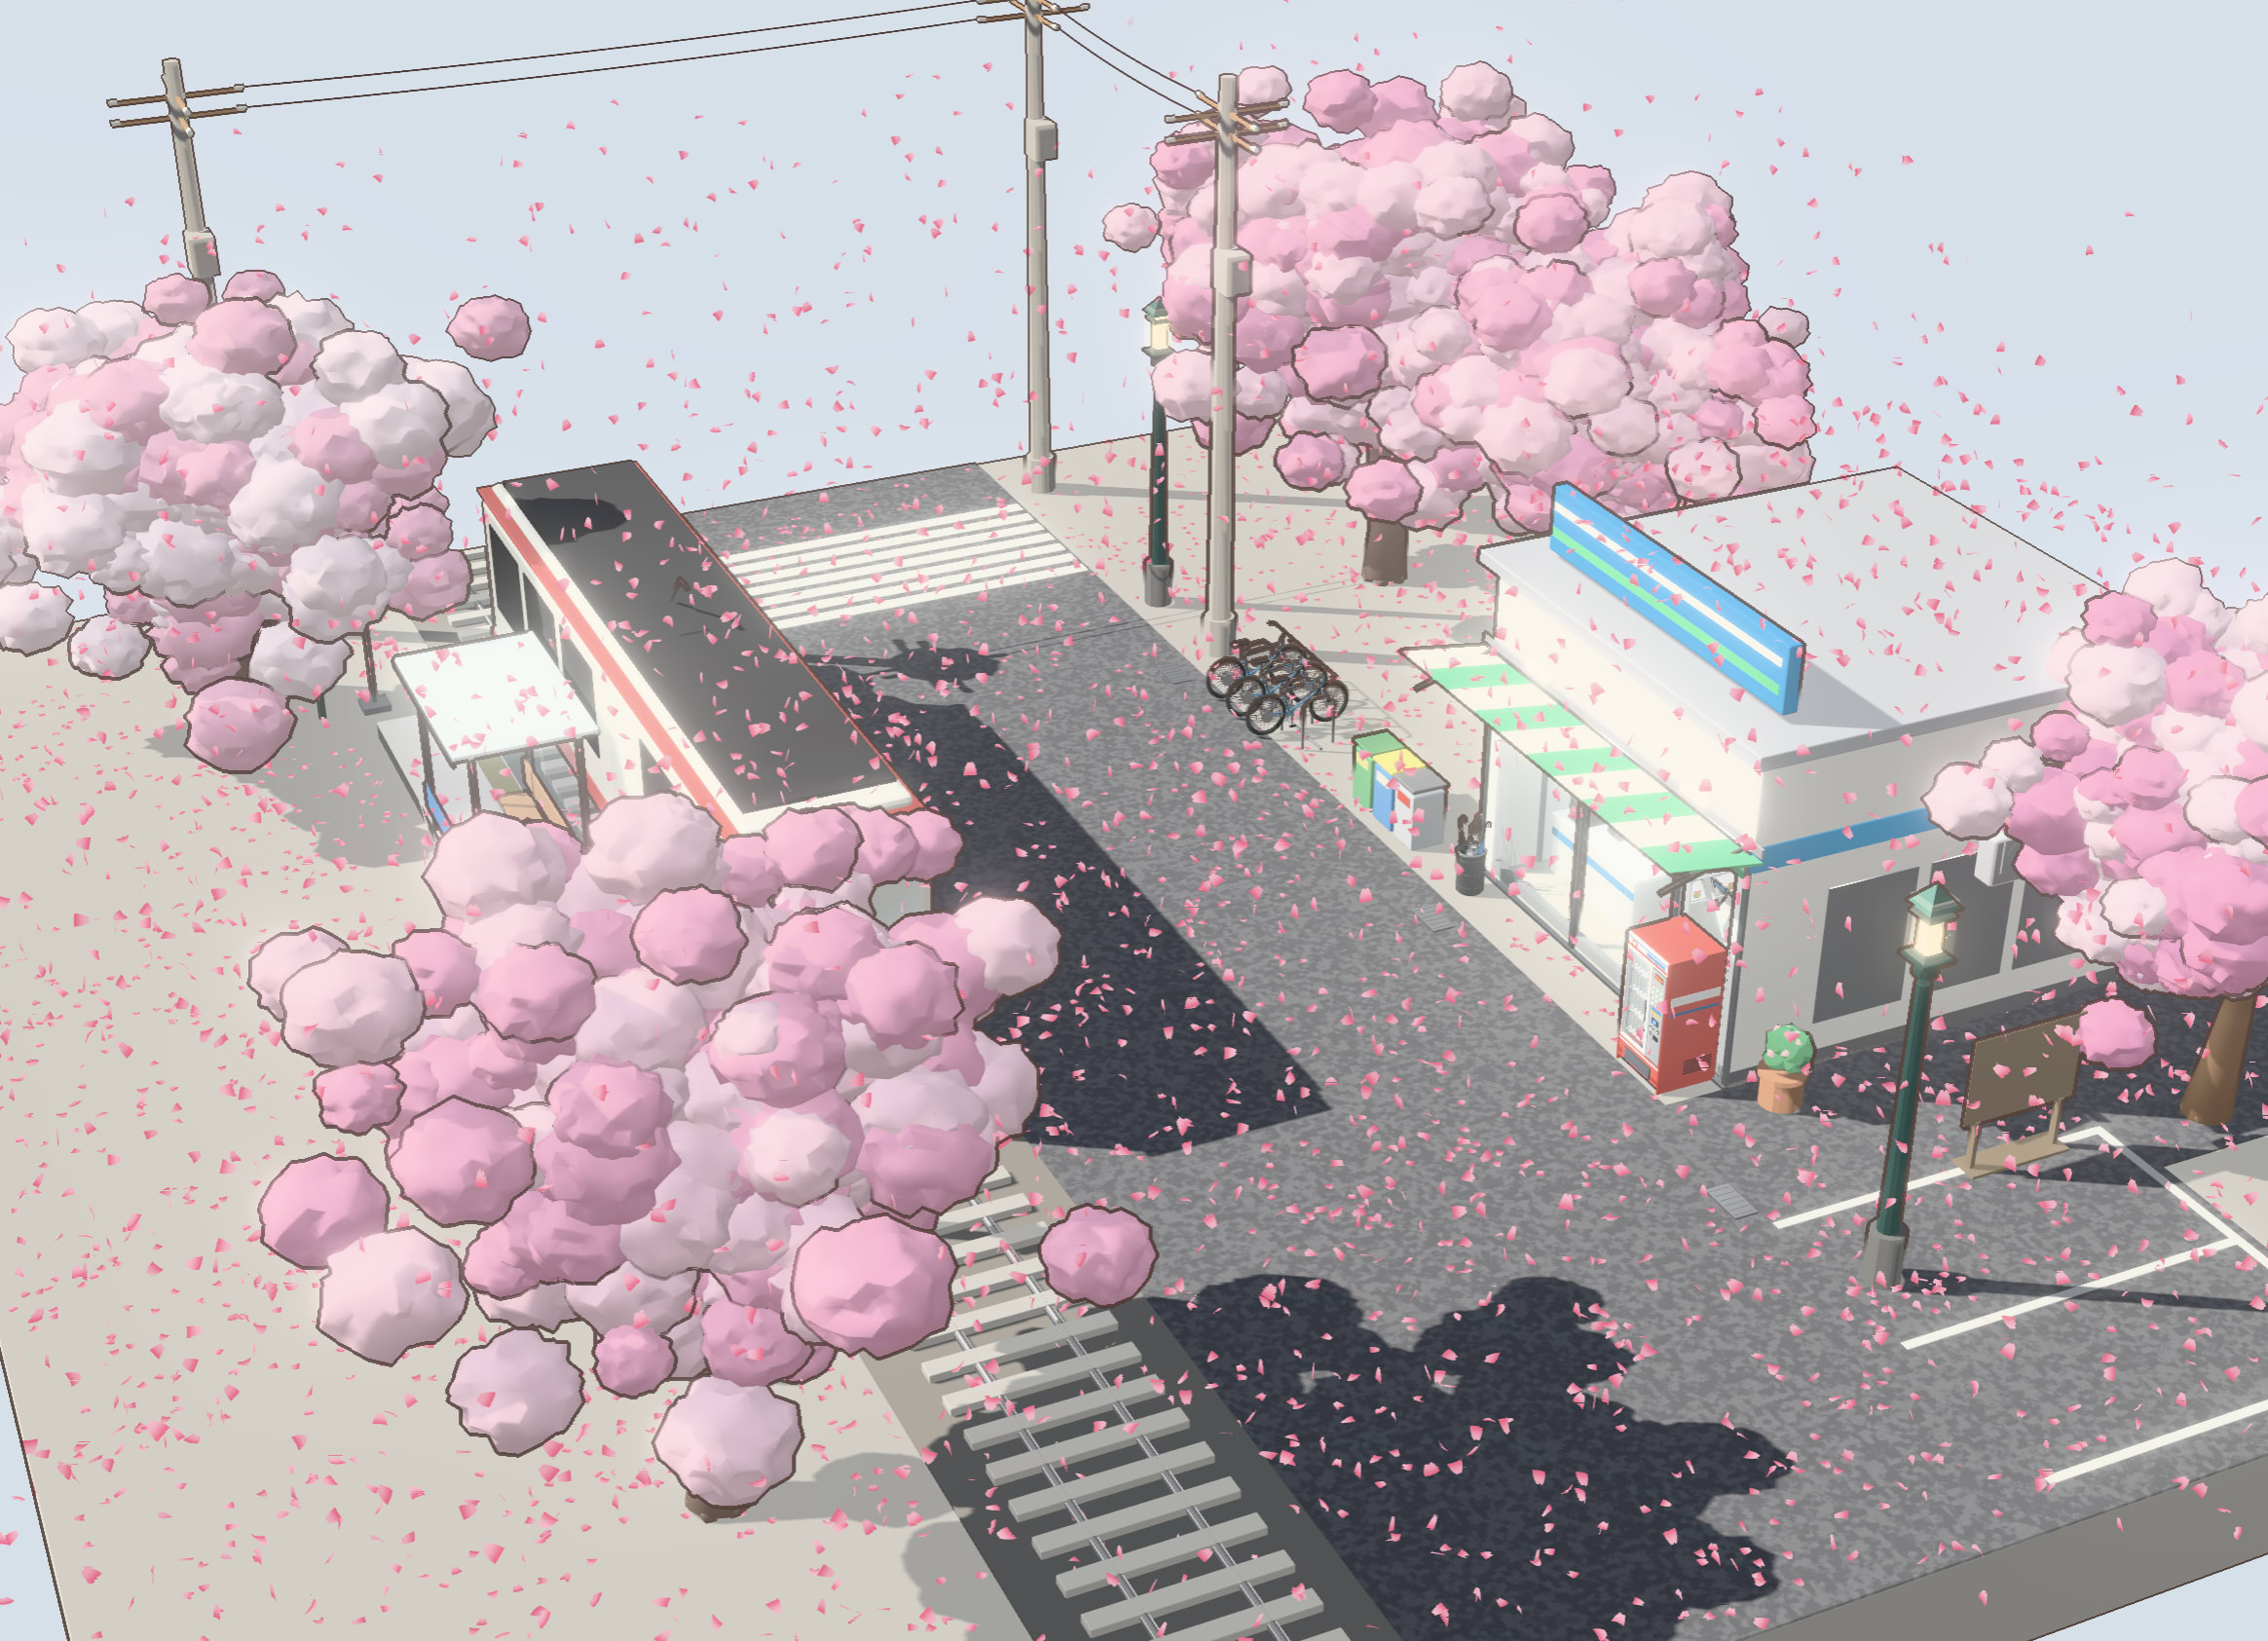
This tutorial mentioned the importance of Agent.md. At first, generate the Agent.md with the following prompt.
Use Blender-MCP to create a miniature 3D diorama of a Japanese rural station corner convenience store, set in a sunny, warm daytime atmosphere. Use a free-roaming third-person viewing perspective, with no UI, pop-ups, annotations, or controls, and no visual distractions. It should support drag, 360° rotation, and continuous (stepless) zoom. Use toon rendering (3D-to-2D style) with anime-style outlines on objects, clear light and shadow contrast, and cinematic lighting. The entire scene should sit on a neat, square, solid-color base.

Organize the core requirements into an AGENT.md file, and carry out this project autonomously until it is complete. Do not ask me anything. When the context exceeds 70%, compress it yourself.

Hard architecture constraints for the project:

Do not pile all assets into one giant .blend file. main.blend serves only as the entry-point framework, like a map, where all the other individual models are assembled. Please implement it in a way that lets me manually adjust things in main.blend afterwards: I need to be able to manually adjust each model’s position, transforms, and so on in main.blend. Every model asset must be split into its own separate model file. Whenever a model needs to be modified, open that model in Blender so that I can see the progress live in Blender.
Then all the assets will have one blender file each, and there is a main.blender to inlude all of them. This result looks fine at a glance. But many details need to adjust either by the agent or manually.
Concept picture first
西高君-AI生成3D游戏场景/Codex+Blender三维模型方法/HD-2D·原来如此简单!. This tutorial firstly generate a concept pic, then make the 3d assets one by one and evetually assemble them in the godot engine.
Concept picture
First, make the concept picture’s prompt.
Create an in-game screenshot of a modern Japanese urban setting. A Japanese RPG game scene. The scene should be beautiful, with a strong Japanese style.

Use a front-facing 45-degree top-down camera angle, with a traditional chibi-style Japanese RPG composition, similar to the camera perspective in Pokémon. The art style should be Genshin Impact-like, with a more aesthetic, picturesque feel. Note: this should be an actual in-game scene, not concept art.

First, come up with the prompt. Start by figuring out Genshin Impact's art style and the composition/camera perspective used in Pokémon.
Then, use the returned prompt with shome research picture to generate the wished picture.
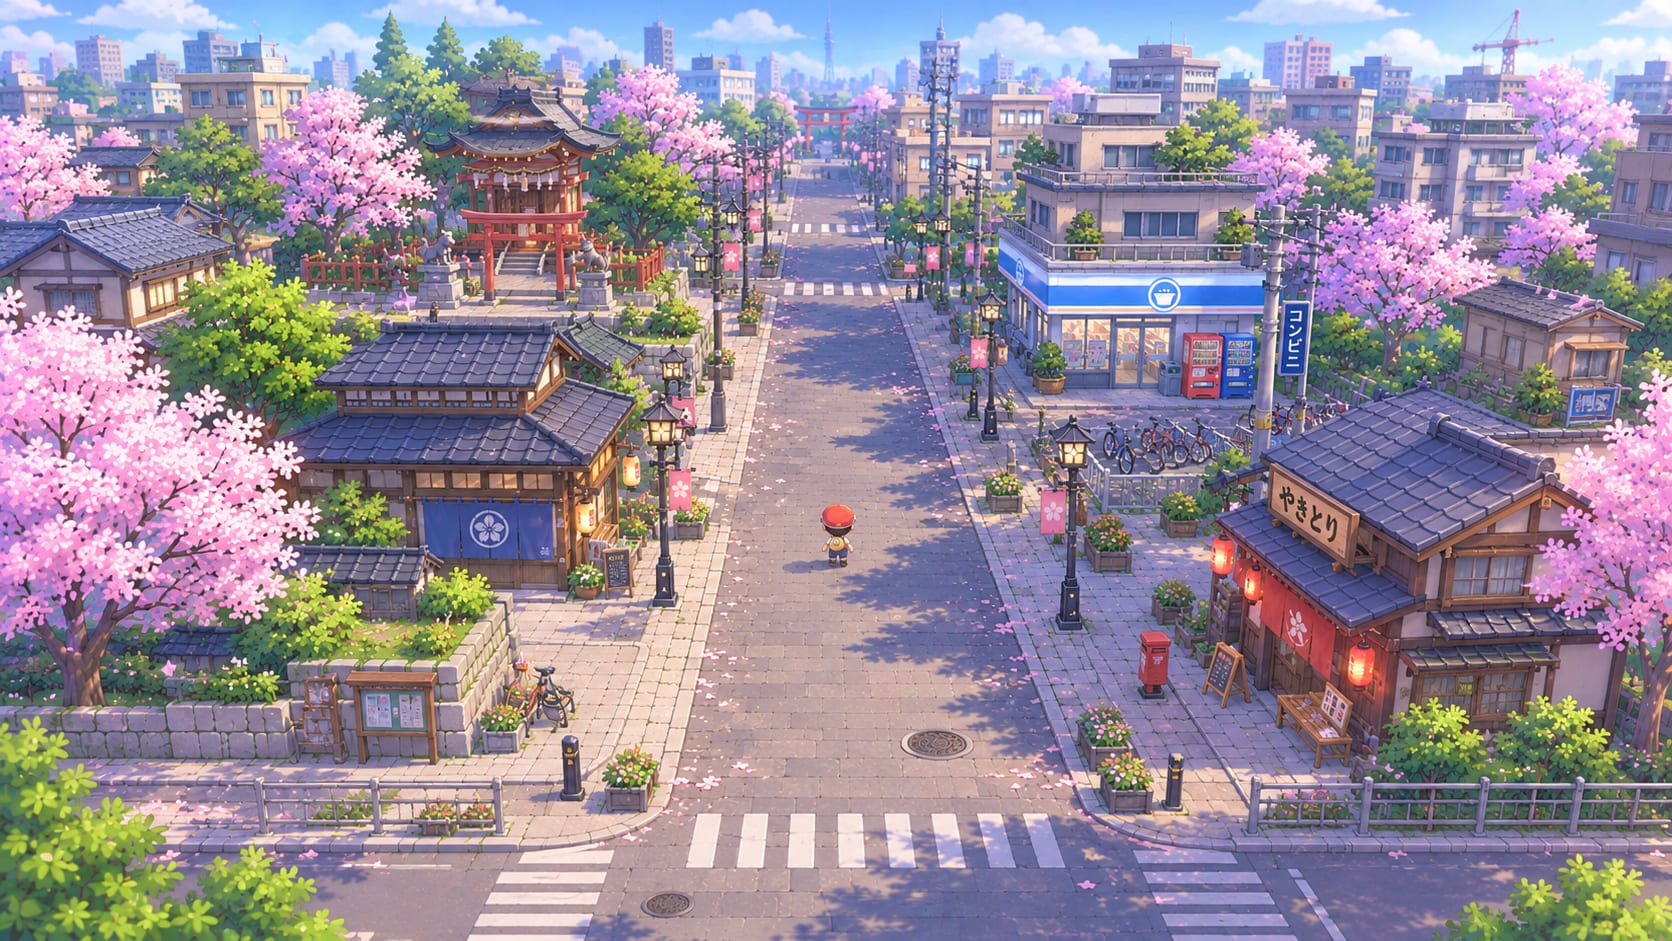
The first generated image will be smaller, you need to ask agent to move the camera back, zoom the scene to 4 times or 5 times.
Split the concept into prompts
Use the following to extract concept picture into prompts. This does not need high end model, Haiku 5.5 can also done the job.
What I learned from this, is that I can extract further buildings into one picture. This reminds me that I can solve the Tallinn city model problem I used to struggle, because there were too many meshes in the scene.
# Task Background

I need to extract every building, plant, and element in this scene individually, then import each one separately into a Godot scene.
I'll use Codex to batch-extract each element from the scene and generate three-view drawings for each one. That means 4 images per element (original, front view, side view, top view).
First, I need you to analyze this image and count how many buildings, plants, props, and other elements there are in total.
Then write out the prompt for each extraction, to be used when calling gpt-image-2.5, and finally output everything to me as an .md document.

# Notes

1. The ground should also be extracted as a separate flat texture. The ground should have no perspective and must be converted into a flat texture map.
2. The three views must use an orthographic projection, with no perspective or angular skew. (Every individual prompt must specifically emphasize this point, otherwise the generated images will come out off.)
3. The farthest background can be extracted in layers as separate building groups, with each group layer as its own image.
4. After extraction, the background should be a uniform dark purple.
5. Any areas of buildings, plants, props, and elements that are currently occluded must be fully completed, rather than extracting only what is visible right now. The occluded parts should be a complete picture, with nothing left floating or unsupported.
6. Because the images are generated in parallel, each prompt is passed in independently, so you can't use an overarching statement in place of content in the individual prompts.
Generate the models
This needs OpenAI’s skill ImageGen to be prepared. However, I fogot that, and used Opus 5.5. The result was even better than the tutorial one…
# Task Objective

Please complete this modeling task based on the reference image and the three-view drawings. The model will be used in a game scene.

# Requirements

1. Recreate the overall form, details, and art style of the building in the reference image as faithfully as possible.
2. The topology (edge flow) must follow game modeling engineering standards: regular and orderly.
3. Model edges should be appropriately beveled to add a sense of volume.
4. The model's total polygon count must not exceed 6,000 tris.
5. After the materials are applied, they should look natural and refined, and match the pixel art style of the reference image. Judge the appropriate UV scale and tiling density from the model's actual size, to avoid texture pixels that are too large or too small, or obvious repetition.
6. The game scene supports 360-degree viewing, so the model must have no obvious blind spots from any angle and look natural and complete from every direction.
7. If the interior is visible through doors or windows, the interior must also be modeled rather than faked with a flat texture.
8. No obvious holes or defects.
9. No obvious clipping (geometry intersecting or poking through).
10. No coplanar overlapping faces, which cause flickering (z-fighting).

# Execution Steps

1. Before modeling, analyze the reference image and three-view drawings, think carefully through each of the 10 requirements above, and plan the modeling workflow yourself.
2. Break the model down and analyze which components it should be divided into.
3. As needed, call the ImageGen Skill for each component to generate the necessary material textures and normal maps.
4. Model each structure individually, then assemble them.
5. Set up the lighting and camera, configure the render settings, and render preview images.
6. Compare the forms and material details against the reference image to make sure everything in the original is faithfully reproduced.
7. Check off the 10 requirements one by one, and correct the wrong
Generate Godot Templates
This is make sure all the assets imported later will be debuggable.
## Task Background

This is a 3D Godot game project. I need you to build two scene element templates so I can quickly import and place scene elements later.

## 1. 3D Model Template

1. Create a .tscn scene template that exposes the following quick-setting options:
 - GLB import.
 - Scale. (Adjust with a slider. Whether scaling up or down, the slider should feel natural and smooth: a light drag shouldn't cause a huge change, and a big drag shouldn't cause only a tiny one.)
 - Pivot point position adjustment for scaling and offset: the four corners and center of the bottom, the four corners and center of the middle, and the four corners and center of the top, for a total of 15 positions.
 - Horizontal and vertical mirror toggles.
2. Automatically detect the model/texture size and intelligently match the collision area. The collision area must also scale along with the scene.
3. By default, the pivot point is at the center of the bottom face.

## 2. Flat Element Template

1. Create a .tscn scene template that exposes the following quick-setting options:
 - Image import.
 - Scale. (Adjust with a slider. Whether scaling up or down, the slider should feel natural and smooth: a light drag shouldn't cause a huge change, and a big drag shouldn't cause only a tiny one.)
 - Pivot point position adjustment for scaling and offset: the four corners, the four edge centers, and the center, for a total of 9 positions.
 - Horizontal and vertical mirror toggles.
 - A quick toggle to switch between ground placement and vertical prop placement.
2. Automatically detect the texture size and intelligently match the collision area. The collision area must also scale along with the scene.
3. By default, the pivot point is at the center of the bottom face.

**Other Requirements**:

1. Create a main scene for me, with the ground and one 3D building set up.
2. Set up a sky environment sphere for me.
3. The assets above have already been placed in the assets folder. There is also a final reference image whose rendering style you can follow.
Import the assets
### Task Background

This is a 3D Godot game project. I need you to use the models in @assets to build the scene shown in @assets\ref.png inside @main.tscn.

### Requirements

1. Carefully analyze the layout of the buildings, trees, grass clumps, and other elements in the reference image. Recreate the position of every building, tree, and grass clump from the original image as closely as possible, matching the layout of the reference.
2. The current scene already has the model and element import template .tscn files set up. Build on top of them. Don't modify the existing templates unless necessary.
3. I have already set up the ground, the background, and the positions of a few key buildings. Do not move the ground, background, or key buildings. Use these key buildings/elements as the basis for building out the whole scene.
4. The scene must stay within the current ground area. Do not extend beyond the current 6 ground sections.
5. The scene should have a good balance of density and openness. It shouldn't look rigid like a checkerboard, and density shouldn't be identical everywhere. It should feel varied, with a natural arrangement.
6. Buildings should connect naturally to each other. Carefully analyze how adjacent buildings join in the original image. Note that some buildings are connected by flower beds, some stand right next to each other, and some have gaps between them.
7. Buildings should not sit right up against the road. Leave room for the sidewalk. Use the sidewalk width at the izakaya's current position as the reference.
8. All models must be used. You can reuse some models as needed.
9. Don't place things casually like toys. Follow the original image to create a natural, realistic city layout atmosphere.
10. All buildings must use the same scale: keep the height of one floor the same across every building, and scale each building proportionally to that standard.
11. Please connect the power lines between the utility poles.
Paricles
The particles should also include debug options
**Task Background**:

**Task**: Please create a particle template for a falling cherry blossom effect.

**Assets**: I have already prepared a sprite sequence of a rotating cherry blossom. It is a 10-frame sequence that loops seamlessly (the last frame connects back to the first).

**Effect**: The cherry blossoms rotate as they fall from the sky like snowflakes.

### Expose 11 parameters for me:

1. The emission range of the particle emitter.
2. The falling speed of the particles.
3. Wind direction and strength, used to control how much the falling particles are tilted.
4. Wind turbulence strength, used to control how the particles flutter in the wind.
5. The number of particles.
6. Random position of particles within the emitter.
7. The rotation speed of the cherry blossoms.
8. The size of the particles.
9. The random size variation of the particles.
10. The lifetime of the particles.
11. Random variation in particle speed.

**Note**:

1. The cherry blossoms must already be visible as soon as the game starts, rather than starting empty and having them gradually fall from the sky.
Light
The light is quite important, beside adjust the sun. The environment also has to be adjusted. There are some shaders included in the tutorial. However, I did not find them very needed. The original one is already good enough.
Then add the character, the game is ready.
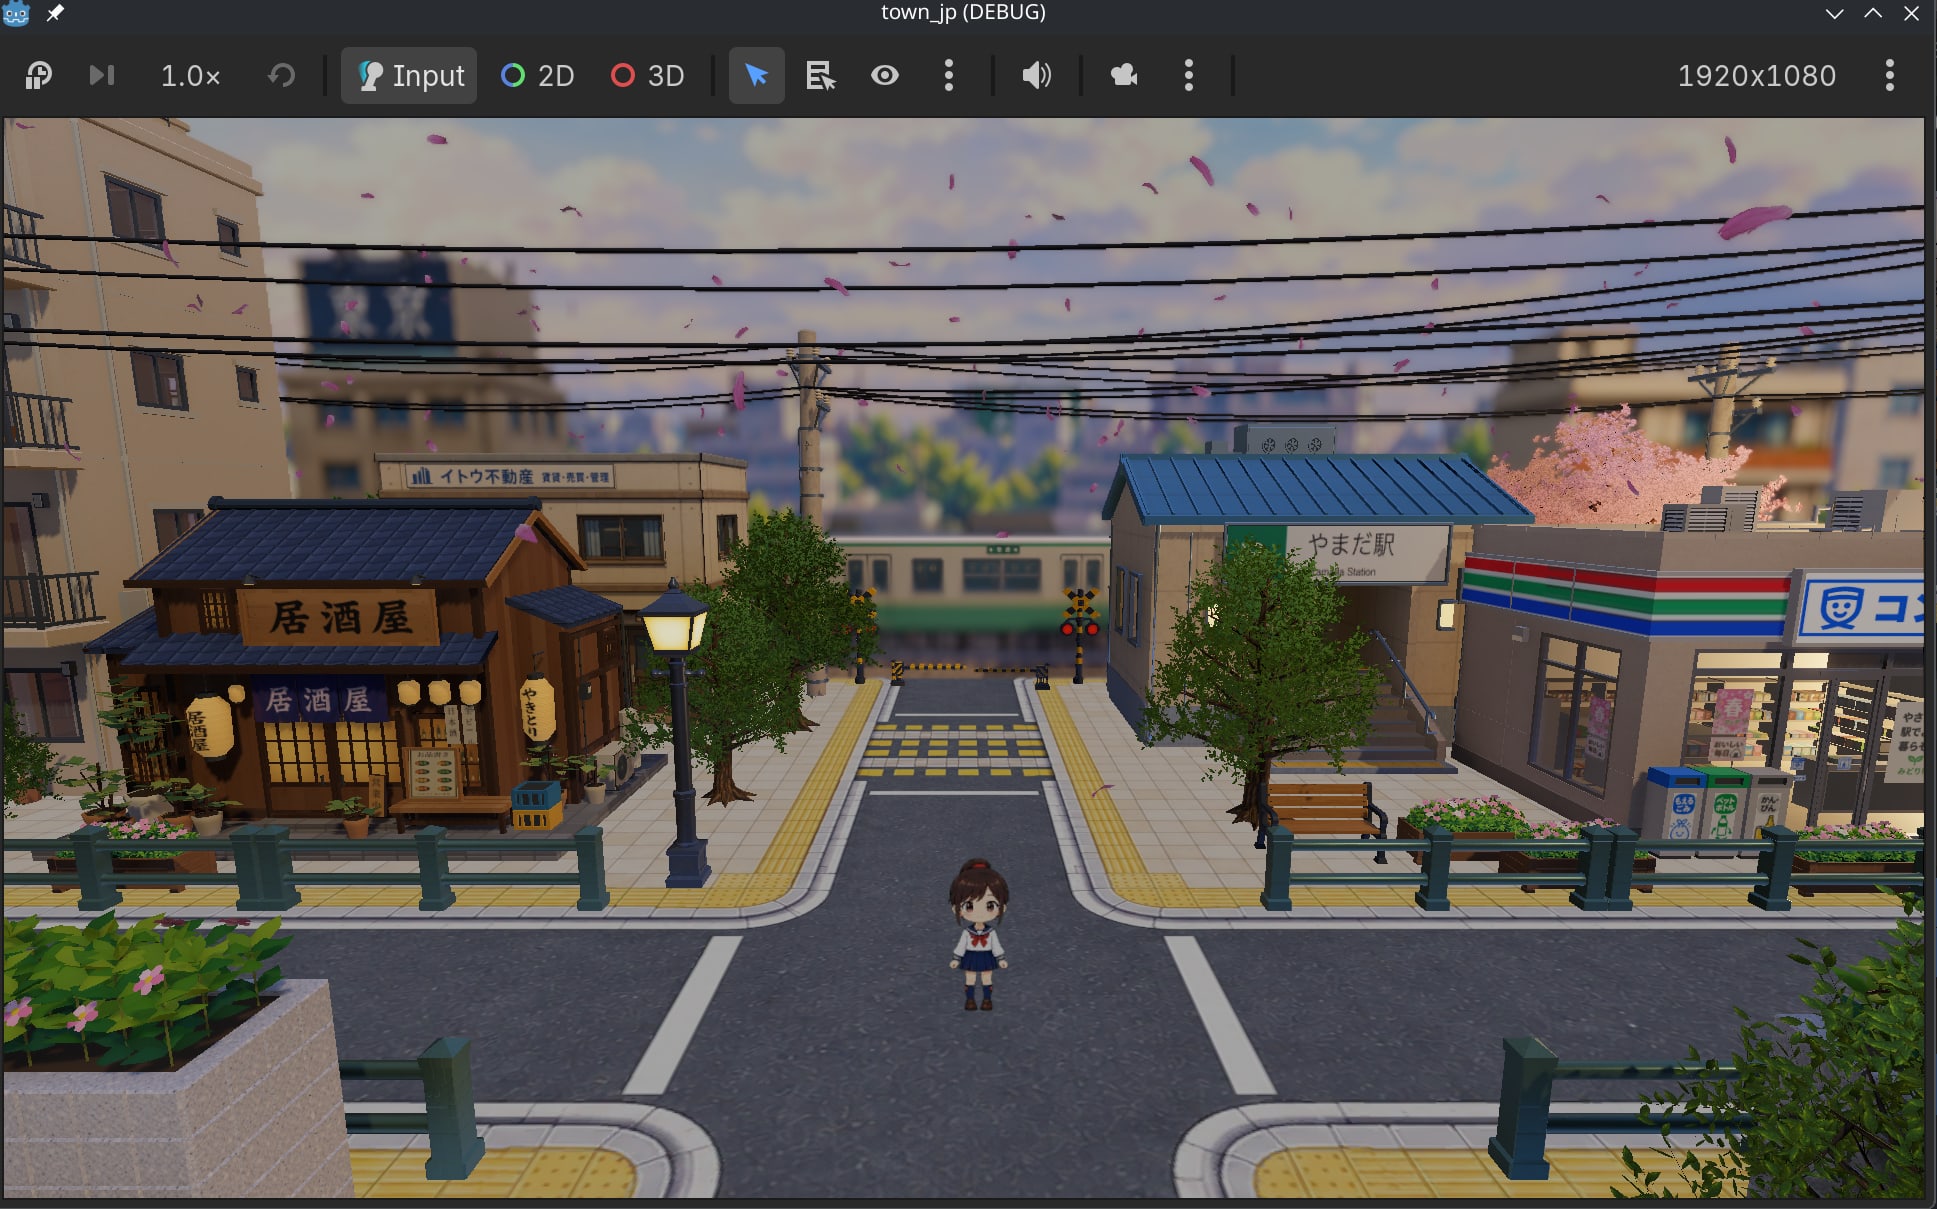
Threejs build
Later, I asked agents to refactor the two projects into threejs. Still, some details were lost, like no particles. But the token usage is becoming acceptable now.
Conclusion
Surprisingly, these two projects only cost me 70% of 5h credits. That means, I do not need to burnout in coding or saving tokens anymore.